Git Exercise
Table of Contents
1. Introduction
This document describes a group exercise, which some students perceive to be challenging. Please do not hesitate to ask early. Your first steps with Git will seem unfamiliar, but my goal is to help you in this unfamiliar terrain. Git is a powerful tool with many commands and options (GitLab even more so), but the basic workflow should not be hard to follow. (As an aside: If you really go for Git, you probably want to do that embedded in your daily work environment, where the most important Git operations are available through some UI. My daily work environment is GNU Emacs with Magit.)
On our GitLab server, I will assign each of you as “Reporter” to my project “cacs-2025”, and GitLab will notify you once that happened. (This will take some time because our admins need to create your account first, before you need to change your university password and log into the GitLab server once, before I assign you manually …) Then, you can start with this task, which is meant to practice the feature branch workflow mentioned in the Git Introduction.
2. Preparation
Install and setup Git as suggested in this Quickstart for GitLab.
Watch this video, which explains general concepts of Git and shows (in its second part) Git operations that are similar to the ones below.
Briefly, a Git repository keeps track of changes on files. Changes
are persisted with commit operations, each of which is executed on
a specific branch. As explained
elsewhere in
more detail, a branch in Git represents a specific version of
all files in the repository, which can be developed independently
from any other branch (e.g., to add and test a new feature without
disturbing others). The default branch of our project is called
main.
In general, for questions that I have related to Git, Stack Overflow has answers. You may want to ask in a course-related forum, though.
3. Tasks
This task is part of a group exercise. In the following, “M1”, “M2”, … indicate actions to be performed by different group members, while “All” indicates actions for everyone.
I suggest that you work on this as group to discuss who does what to help each other; sometimes I suggest to share screens (physically or virtually).
(You can also perform the following steps individually, e.g., by copying your cloned directory into multiple directories, one for each group member. Then, you can perform each step in the directory for a “simulated” group member.)
3.1. Part 1: Fork and clone
- Determine group member M1 who forks project “cacs-2025”.
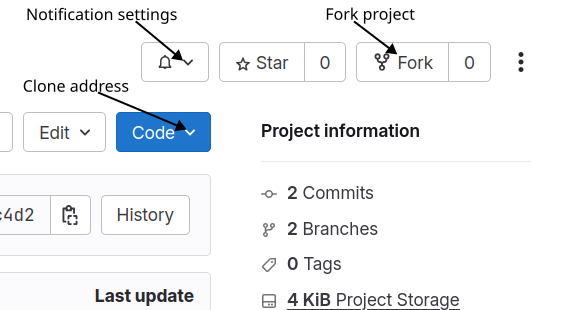
M1: Go to my project and perform the fork (see screenshot, which shows my browser’s upper right). Default settings should be fine.
In your fork, assign the remaining group members as Maintainers and me (my username is lechtej) as Reporter or higher. (Maintainers can do everything in a project, while Developers cannot push to the
mainormasterbranch, enforcing to work with other branches. As Guest, I can neither clone your fork nor see your branch. That would be possible in other roles, maybe allowing me to help.) To assign members in the fork, to the left, go to the project’s “Manage → Members” (not part of screenshot), search members and assign roles.The newly added project members (including me) receive e-mails with the address of the forked project.
All: Check your notification settings (see screenshot, User preferences → Notifications for general settings and bell icon with Notification settings for visited project), where you can configure for what events to receive e-mails. Maybe “Watch” your own project.
Clone the fork to a local directory “cacs-2025”. The necessary address (starting with
git@) is visible under the Clone button (see screenshot) under “Clone with SSH”.git clone <use Git address here>
Note that cloning creates a new directory, into which you need to change before executing Git commands:
cdcacs-2025
3.2. Part 2: Understand order of commits, experience and resolve conflicts
For this part, work on the branch test-push-pull (which you
automatically forked from the upstream project). That branch will
be ignored in later parts, so your specific changes of files do not
matter much. Note that commits on a branch are ordered linearly to
follow one another.
All: In your cloned project, switch to branch
test-push-pull:git checkout test-push-pull
Then, group members perform different actions and commit afterwards:
M2: Add a new first line to
README.md(can be random data, will stay local to your fork).M3: Add a line to the bottom of
README.md.M4: Also add a new first line to
README.md(without knowledge of what M2 does).M5: Create a new file
test.txt.Other members (or M1): Create other files. Coordinate to make sure that you create files with different names here (in particular, not
test.txtagain).Everyone: Persist your changes with commit operations in Git’s history. This requires to first add the file(s) whose changes should be included in the subsequent commit operation:
git add name-of-changed-file
git commit -m "Describe change with message"
Verify among team members that the commits for the above changes succeed for everyone.
Clearly, your commits violate the requirement of a linear order. (All of them share the same parent commit.) This is asking for trouble (but can easily happen in practice if multiple people work on the same branch or if you clone a repository to multiple devices).
All: Prepare to push the changes, i.e., to transfer them to the server. Make sure that M5 is the fastest to complete the push operation, before everyone else tries to execute a push operation:
git push
Note that pushing fails for everyone after M5 with a
rejectederror message informing that the remote repository contains commits that are unknown in your local repository.This happens because your local commits are not linearly ordered but concurrent. Note that Git output suggests
git pullto merge those commits.M2: Share your screen, execute
git log, and note the most recent commit. Performgit pull(which fetches commits and initiates a merge operation).This initiates a merge operation, which adds a merge commit, for which you need to supply a commit message. Do so. Note that the file created by M5 is present now. Execute
git statusandgit logafterwards. Relate to the purple branch the slide “Key Terms: Branch, Merge”. Discuss.Note that you see several branches on the slide, while you may believe to work on one. That belief would be wrong: Each of you works on an independent local branch with its own commits, which you try to combine with a second remote branch that potentially includes other commits.
Maybe raise questions in class or in the forum.
Push the changes.
M3: Share your screen, perform
git pull, including the merge commit. Confirm that the changes of M5, M2, and M3 are incorporated inREADME.md.Thus, the concurrently created versions were merged successfully by Git. This is not always the case as you see next.
- All: What do you expect to happen if M4 pulled commits? Note that M2 and M4 concurrently changed the first line of the same file. How should an overall integrated result look like? Discuss possible options, then proceed to the next step.
M4: Share your screen, perform
git pull. Differently from the previous merge commits, Git now reports a merge conflict and asks you to repair the situation manually. Executegit diff. Note that the output contains so-called conflict markers to highlight conflicting regions.Now, it is your task to think about those regions: Should just one be preserved or both? Should they be combined? Do you come up with a totally new idea?
Change the file in whatever way seems most appropriate. Delete the conflict markers. Add, commit, and push.
- M1 or some other team member who added a new
file: Share your screen and execute
git log, thengit pull --rebase. This time, Git initiates a rebase operation to perform your commit on top of the pulled commits, without a merge commit. Push your state.
That’s it for this part. We do not use branch test-push-pull any
further.
3.3. Part 3: Work with branches
From now on, you work on branches with the intent of sharing with the entire class.
M2: From
main(dogit checkout main; this brings you to the clean state that you forked and did not change so far—if you see commits by any group member withgit log, it may be easiest to clone or fork the project again for a clean state), create a new branch that collects your group work for this task, say “g42-task-1”. Create a new sub-directory (under “cacs-2025”) for your group, e.g., “G42” if you are group G42.Please restrict all your group’s changes to that sub-directory.
As this was missed by several groups in the first run, let me repeat: Create a new branch (e.g.,
git checkout -b G42-task-1) and a new sub-directory (e.g.,mkdir G42). This task is meant to familiarize you with the feature branch workflow, and the directory provides a scope for your file names. (Several groups created files namedtest.txt…)If you do not create a directory, I will reject your merge requests later on, asking you to move your files. (Then, you may want to read
git help mv.) If you do not use a branch, then you need to read about protected branches at GitLab; note thatmainis protected by default, and group members with the role Developer are not allowed to push.Add a first document (which will be shared via my project with the entire class subsequently, so, please, take some care), either a text file or some lightweight markup language; maybe start to document your experiences, questions, and answers. Commit (maybe more than once) and push the branch (the first push operation of a newly created branch needs option
-u originlike this:git push -u origin G42-task-1).- M3: Pull and check out your branch, change the file more, commit, and push.
M4: Create a merge request in GitLab for your branch into my
mainbranch. (On the top of your fork’s project you should see a suggestion to create a merge request for your branch. Maybe refresh the page.)When you create merge requests, please fill out the title (e.g., Group 42 - Task 1). The description may remain empty here; in a real project you would explain what you propose to be merged. Note the option “Delete source branch when merge request is accepted”. Make sure to uncheck it if you want to keep your branch.
3.4. Part 4
After I merged your branch, my project is ahead of yours. To bring your project up-to-date (possibly including changes of other groups as well), do the following (see slide on “git remote”).
M5:
git checkout main
git pull
git remote add upstream <URL of original project>
git fetch upstream
git rebase upstream/main
git push
Note that by default only Maintainers can push to the main
branch of repositories, so M5 needs to have that role (assigned
above by M1).
You now completed a cycle in the feature branch workflow (a branch in your forked project provides a feature for my upstream project), and you updated your fork with upstream commits. You will practice this workflow by adding answers to review questions for upcoming presentations.
4. Further remarks
We work on a playground project here, and it is unlikely that you
destroy things (well, git reset and options that “force” actions
may destroy state; you should not need them). If your local
repository seems to be in an inconsistent state, you could just give
that up and clone again (depending on the amount of work that you
did locally; you can also copy files from the inconsistent state to
a new clone).
Given the above instructions, all group members worked on the same branch, with strict sequences of pull, commit, and push for different members. You may prefer to work more independently of each other on different branches, which you merge on your own. Then, you apply the feature branch workflow within your own project.
Again, please do not hesitate to ask in a course-related forum.
5. What’s next
You have experienced Git as sample communication and collaboration system for distributed teams. In the next presentation, you will learn to position Git as an example of so-called distributed systems, and we will revisit the notions of consistency and conflict in that larger context.
6. Git for Exercise Points
In 2025, your group needs to create two merge requests, the first one as explained under Part 3 above, the second one later on to submit your group’s presentation.
For full individual points, make sure that each group member participates with at least one commit or merge request.
Have fun!
License Information
This document is part of an OER collection to teach basics of distributed systems. Source code and source files are available on GitLab under free licenses.
Except where otherwise noted, the work “Git Exercise”, © 2020-2025 Jens Lechtenbörger, is published under the Creative Commons license CC BY-SA 4.0.
Created: 2025-06-23 Mon 11:02